Bicycle Tune-Up Step 6 - Adjust The Brakes
1. Squeeze the brake pads against the rim to see if they are at the right height. They should not rub on the tire nor should they be able to slip under the rim. (Very dangerous!)
To prevent squeaking, the pads should also be "toed-in," which means the trailing (front) edge of the pads should touch the rim with the brake applied lightly. When you apply the brake hard, the pads squish a little and you should get full contact to the rim. With most steel brakes on older bikes, you carefully bend the caliper arms to get proper toe-in. With the aluminum alloy cantilever brakes found on most modern bikes, set the toe-in by adjusting and re-tightening the brake pad holder. Do not bend cantilever brakes, or brakes on old Italian bikes because they are made from a more fragile metal or mounted on posts that can be damaged.
Some cantilever brakes have springs that can be unhooked while adjusting brake pad alignment and cable tension. Re-hook the springs when done.
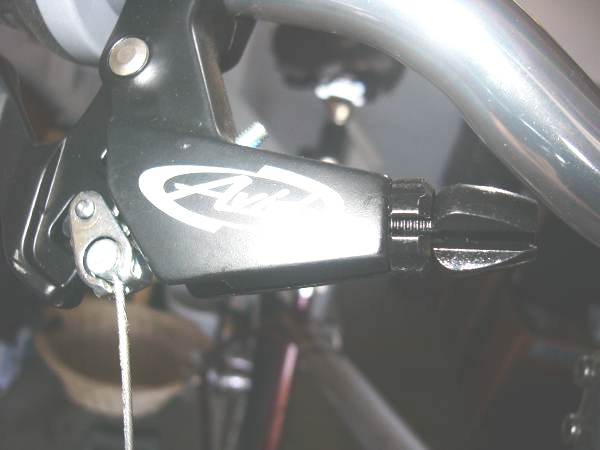
2. Look for an adjusting barrel, a long hollow bolt in which the cable housing terminates, but the inner wire goes through. This adjusting barrel may be on the hand lever, or on the brake caliper (the main part of the braking system at the wheel). Screw the barrel all the way in to loosen the cable as much as possible.
Common brake types
Sidepull brake
3. Loosen the anchor bolt, pull the cable inner wire tight while squeezing the brake pads together, and re-tighten the anchor bolt. The anchor bolt may trap the cable inner wire under a plate or washer to secure it, or the anchor bolt may have a hold drilled through it to capture the inner wire.

Anchor bolts
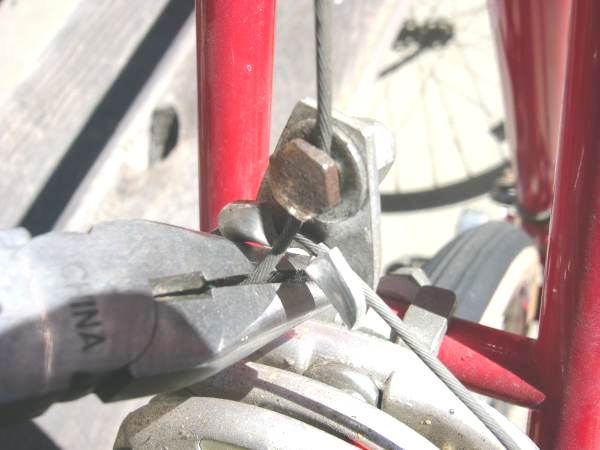
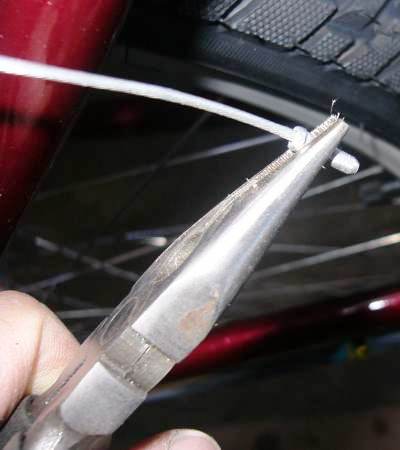
Sometimes an assistant is helpful for this step. An expert can usually squeeze the brake pads against the rim with one hand while tightening the anchor bolt with the other. If you can't manage it, and don't have an assistant handy, a brake inner wire pulling tool is available. This is called a 'third hand tool.' You may not have a third hand tool. In that case, you can generally grab the inner wire with a pair of pliers just past the anchor bolt, and twist, pulling the slack out while tightening the anchor bolt with your other hand.
The tightness of this bolt is critical. The first mistake most beginning bike mechanics make is to break an anchor bolt. Yet, if you don't tighten it enough, when the brake is applied hard in an emergency stop, the cable will slip through the bolt, causing an accident. You must test the bolt by pulling hard on the brake hand lever to be sure the cable does not slip. This test is good for cables too. A weak cable will snap. You'd rather have it snap during the test than when riding!
4. You can fine adjust the brake tension by unscrewing the adjusting barrel a little bit. This effectively shortens the cable.
5. Center the brake if it is too close to one side of the rim. Before this step, make sure the wheel is mounted correctly. Sometimes what appears to be a badly centered brake is simply a wheel fastened in slightly sideways.
If It Is A Sidepull Or Centerpull Brake:
Try loosening the mounting nut (that holds the brake caliper onto the bike), holding the brake caliper centered, then retightening the nut.
If the caliper stubbornly returns to the same position, leave the nut tight, then gently bang on the spring with a punch or dull screwdriver and hammer. The impact will cause the position of the caliper to shift.
If It Is A Cantilever Brake:
Many modern brakes have an adjusting screw on on or both calipers that applies pressure to the spring. The more you tighten the screw, the further away the brake pad will rest from that side of the rim.
Some Shimano cantilever brakes (and "U-Brakes") have a two millimeter allen screw that you turn to adjust centering.
Some Suntour cantilever brakes have an allen head screw that you can loosen, allowing you to reposition the spring, and then retighten.
If no spring tension adjuster is found, most cantilever brakes have the brake pads mounted on rods so that you can loosen the holders, slide the pads to the proper position and retighten. It is difficult to hold the pad in the proper position while retightening. Patience and perhaps a pair of pliers is required.
Sometimes adjusting the position of the pads is insufficient. Release the cable, then check to see if one of the pivots is stiff or sticking. If so, disassemble, clean with sandpaper, apply grease, and reassemble.
6. Check all the nuts and bolts in the braking system (that you have not already attended to) for tightness.
7. Sidepull brakes often need one more adjustment. The centerbolt has two nuts that work like a bearing adjustment to keep the looseness of the brake properly adjusted. If too tight, the brake will not spring open. If set too loose, the brake will grab or chatter.
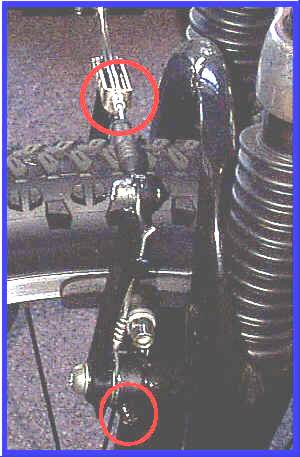
This brake, representing a very common style, can be opened quickly without tools for removal of the front wheel. Squeeze the brake together and then lift the cable casing out of the clip on right side caliper. To center this brake, tighten or loosen the small screw (Allen or Plillips head, depending on the model). The little screw pushes against the brake caliper return spring, causing the caliper to pull back harder on this side when the screw is tighter.
![]()
Examine the brake cables for fraying. Look carefully at the part of the inner wires connected into the hand levers. A cable with even one broken strand is not reliable.
Replacing a cable is easy. At the bike shop you can buy a universal cable. It will be long enough for any bike, and may have two ends on it, one of which will fit any bike.
Using sharp diagonal or wire cutters, cut off the end that does not fit your bike. Pull the inner wire entirely out of the housing (sometimes called "casing"). Lay the housing against your bike and cut it to the proper length. Make sure to allow enough length that the handlebars can be turned fully to either side.
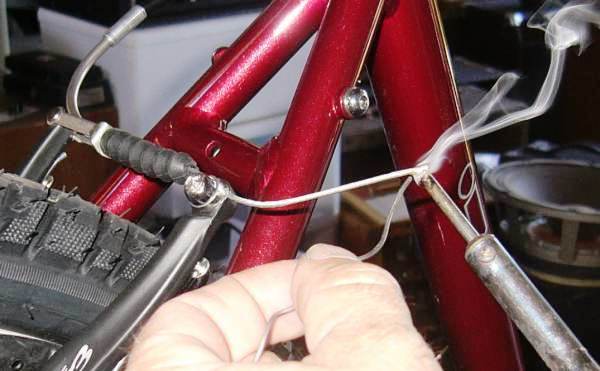
Cover the inner wire with grease, then slide it into the housing. Hook the inner wire into the hand lever, then have an assistant or a clamp (available at bike shops, called "third hand tool") squeeze the brake caliper while you pull the slack out of the cable wire and tighten the anchor bolt.
Squeeze the hand lever hard, then loosen the anchor bolt, pull more slack out of the inner wire and retighten. Fine adjustment is made by turning the adjusting barrel. Test your work by squeezing the hand lever hard. The cable should not slip.
Cut off excess cable wire at least one inch beyond the anchor bolt. This will leave you something to pull on the next time you adjust the brake. Solder the end or put a little cap, called a cable ferrulle, on the end of the wire to keep it from unraveling. Ferrulles are available at bike shops which fit over the end of the inner wire, and are squeezed with pliers to fasten them on. Solder is preferable because the cable can be removed and reinstalled without changing the tip, and the solder can't fall off. To solder effectively:
1. If the soldering iron tip is not covered with clean, shiny solder, sand it clean, heat it up, and apply fresh flux and solder to cover the tip.
2. Let the iron heat fully, and apply a bit of solder.
3. Touch the wet solder on the tip of the iron to the inner wire. The wet solder makes greater contact than a dry tip, so the heat will transfer better.
4. Wait until solder touched to the other side of the wire melts, and let it flow in among the strands. Flick the wire (while wearing goggles) if you have an excess blob to shake off.
Use rosin-core, not acid-core solder. Note that solder won't stick to stainless steel wires, unless you use special stainless solder.
In case you are wondering about the difference between a soldering iron and a soldering gun: An iron is generally long and thin, has no on/off switch, and is left plugged in and always warm but takes a while to warm up. A soldering gun has a trigger switch and heats up quickly when the trigger is squeezed. I prefer to use a gun to avoid hot clutter on my bench, but used an iron in the picture below.
![]()
The Brake Pads
Look at the brake pads. If they are not new-looking, replace them with good quality pads. Expensive ones work best, and the difference can be dramatic, well worth the difference in price. The single most effective improvement in a poor bicycle braking system is to put on the best brake pads you can get.
![]()
Diagnosing Brake Stickiness
The most common brake problem is that the brake does not open well after being squeezed.
Apply the brake, not from the hand lever, but by squeezing the caliper itself. If it opens well, the problem is not in the caliper. Squeeze the brake caliper again and with your other hand squeeze the brake hand lever. Let go of the hand lever, but not the brake caliper. Can you move the hand lever easily? If so the problem is in the cable.
If the brake lever is stiff, disconnect the cable to be sure the problem is isolated in the hand lever. A stiff hand lever can sometimes be fixed by applying careful pressure laterally, to free up the pivot. Oil sometimes helps and never hurts if used in a very small quantity.
![]()
Hand Levers
Hand levers found on some ten-speed bikes with low curved handlebars sometimes cannot be mounted securely because the brake levers' mountings do not fit the diameter of the handlebar. The best repair is to replace the handlebar or the brake levers.
Extension levers (also known as "safety levers") often have adjustable pivots. You may leave their mounting screws loose if there are springs inside the pivot posts to keep the bolts from unscrewing due to vibration.
Extension ("Safety") Levers
![]()
Next - Rear Derailleur Adjustment
Tell a Friend About BikeWebSite
Please feel free to link your web pages to www.bikewebsite.com.
![]()