![]()
Oxy-Acetylene Welding
Brazing and Silver Brazing
The strongest way to attach steel bicycle frame tubing
is brazing. This is a process
similar to soldering, or using hot glue, but with a golden colored metal called
brass. Brass is not as strong as
steel, and so is not used for knives, or bicycle frame tubing, but is a metal
that's very much strong enough to attach steel tubes together.
Brass melts at a much lower temperature (1600 Fahrenheit - 870 Celsius)
than steel (2300 Fahrenheit - 1260 Celsius).
As you approach a metal's melting point, the metal crystallizes, and it's
alloys can separate. So, if you can stay well below the metal's melting point,
you'll end up with a stronger attachment.
Two types of Brazing
'Slip,' 'flow' or lugged' brazing is the most common
style. In this technique, frame tubes are joined with sockets called lugs. A
large area, encompassing the lug and tubes are heated until brass will melt.
Brass rod is placed against the edge of the lug, and melts.
Capillary action causes the brass to flow into the lug, filling the gaps
between the frame tubes and the inner walls of the lug. Slip brazing is very
much like soldering copper plumbing pipes. This is a very strong method of
attachment. The drawbacks are:
* Lugs are required.
* Precise fitting is required in order to create gaps of
the proper width for the brass to flow.
* Cleanliness is very important, because dirt or
residuals of oil of any type can cause places where the brass will not flow.
* It is difficult to see the difference between a well
executed slip braze, and one that is not strong.
* Practice and experience are required for reliable slip
brazing.
* If too much brass is added, it pools at the edges of
the lugs, requiring reheating or careful grinding to clean up.
Slip brazing can be used in situations other than frame
tubes and lugs. Slip brazing is
used to attach cable guides and water bottle fittings.
Slip brazing can be used to attach plates that are tangent with a lot of
surface area.
We'll talk more about the exact technique of slip
brazing later.
Fillet brazing is used when lugs are not available or
appropriate. Two parts - usually frame tubes - are filed or ground to fit well
together, and clamped in position. A
small flame is brought close, and an area of tangent tubing is heated enough to
melt brass. The brass is applied
from a rod with very careful control of the heat so that it doesn't melt and
flow all over the place, but melts only sufficiently to glue the two parts
together. The torch and the brass
rod are moved along the joint, building a fillet, or a ridge of brass all the
way around the intersection. Sometimes,
the tubes are joined without a lug, but with slip brazing where they touch
before fillet brazing is applied over the top of the slip braze.
Fillet brazing is used for all sorts of things other
than frame tubing. You can use
fillet brazing to build jigs, repair household items, and make or fix tools.
We'll talk more about the exact technique of fillet
brazing later.
Silver Brazing
Silver brazing rod is brass rod with as much as 40%
silver alloyed in. You can stay even further away from steel's melting point
using silver brazing rod (often mistakenly called silver solder) which melts at
as low as 1200 Fahrenheit - 648 Celsius. Silver
brazing material is also more liquid when it's melted, however it doesn't have
as much strength for fillet brazing as normal brass.
Let's Do a Slip Braze
1. Attach a rosebud tip to your torch if you have one,
or a medium to large #2, #3 or #4 torch tip.
2. Prepare two frame tubes by mitering one to fit
against the side of the other. Find
a lug that fits nicely. The tubes
should be somewhat difficult to push into the lug, but not so firmly that they
can't be disassembled by hand.
3. Clean the lug and frame tubes totally.
No rust, oil or paint is allowed.
4. Mix powdered brazing flux with water to end up with a
paste. Coat the ends of the tubes
with flux, and push them into the lug. Hold
the assembly in such a way that you can access both sides, but without any
stress or gravity pulling on the assembly.
5. Put on your goggles. Light the torch, with a somewhat
large flame. While holding a brazing rod (3/32 or 1/16") in one hand, hold
the torch in the other.
6. Wave the torch over the entire area of the lug and
tubes, keeping the torch 1 or 2 inches (2.5 to 5cm) away from the parts. The
idea is to bring everything up to the same temperature at once, without
overheating any part. If you are
starting to overheat a part, you'll see it turn redder than the rest.
Places to watch are points and edges of the lug.
If you sufficiently overheat a part, it will be crystallized upon
cooling, and will not be as strong as it should have been.
Also, overheating can burn the flux, making a mess through with the brass
will not flow.
7. When the flux starts to melt, apply the brazing rod
to an edge of the lug. Soon, some
of the rod will melt, and the brass will float into the gap between the lug and
the tubing. Keep waving the torch around. Do
not let the torch get too far away. The exhaust from the flame, along with the
smoke made by the flux will keep oxygen away, since oxygen is the enemy of good
brazing. Once the area is
oxygenated, the brass will not flow properly.
8. Continue adding brazing rod at the edge of the lug.
If you are a good slip brazer, you'll be able to add the rod at just one
point along the lug, yet the entire intersection will be filled with brass. You
are done when you see brass at all the edges.
If you go too far, you'll end up with bulges of brass at the edge,
especially under the bottom of the lug. Keep
waving the torch around, never let it idle in one position.
Keep an eye for overheating - redness that starts to glow more brightly
than the rest of the intersection.
9. Let the intersection cool slowly.
Avoid breezes.
10. When cool, check out your first brazes.
These should be experiments that you can afford to waste.
First, sandblast or wirebrush the edges of the lug, and see if you can
see brass throughout the intersection. Then,
saw the intersection apart, and see what happened inside, in the gap under the
middle of the lug, and all around the intersections.
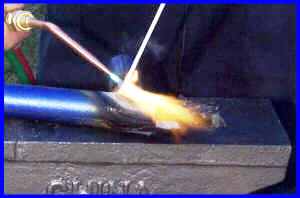
Let's Do a Fillet Braze
1. Miter a frame tube to fit against another.
They should fit so closely that there is no gap of more than .020" -
1/2 millimeter.
2. Clean the tubes entirely. No paint or oil residue is allowed.
3. Clamp the tubes so that you have access to the entire
intersection, and so that no stresses are applied.
4. Mix some brazing flux with water to create a paste,
and brush it around the intersection.
5. Let's start with a lugless slip braze, and then we'll
apply a fillet braze over that. Use a fairly large torch tip, #2 or #3 are good
sizes. Light the torch.
Pick up a fairly small flux-coated brazing rod (1/16" or 3/32")
in one hand, and wave the torch all over the intersection with the other hand to
pre-heat it. Keep the torch about 1 to 2 inches (2.5 to 5cm) away from the
parts. Be careful about overheating the edges of the tubing.
When you see the flux start to melt, apply the brazing rod to the
intersection. It will melt, and
flow throughout the intersection. You
may need to apply the rod to a couple of places around the intersection, unless
your parts fit together very well. Keep
waving the torch around, never let it idle in one position.
6. When the brass has flowed entirely into the
intersection, turn off the torch and switch to a smaller torch tip such as #1 or
#2.
7. Relight the torch, and grab a bigger, flux-coated
brazing rod such as 3/32" or 1/8."
8. Move the torch in close to the intersection so that
the tip of the inner blue cone of the flame is about 1/4 to 1/2 inch (6 to 13mm)
from the intersection, and wave it in a continuous, small circular or zigzag
pattern over a side of the intersection. As
the flux starts to melt in that area, add the brazing rod.
Let the rod melt in the flame, but just enough to flow across the
intersection, but not as much as if you were slip brazing.
The idea is somewhat like caulking a bathtub.
You want to build up a bead of brass, not let it flow.
However, the brass has to melt enough to join with the steel tubing.
Move slowly along the intersection, adding more brass so you are creating
a bead along the intersection. Keep
waving the torch in a small motion. When you have gone 1/4 of the way around the
intersection move to a point on the other side of the intersection, and fillet
braze that side for 1/4 of the way around.
Then, fill in the section between the end of the first fillet braze, and
the start of the second one. Finally,
fill in the last 25% of the way around the intersection.
This is done in four steps rather than a continuous bead from start to
finish to avoid building up as much stress from the expansion of heating and
contraction of cooling. With practice, you'll gain sufficient skill to move
quickly, and leave a bead behind that looks as nice as an arc welder.
9. After your intersection cools, put on clear goggles
and chip off the brazing flux. Examine
your work.
10. Put the intersection in a vise and bash at it with a
sledgehammer. Really! The point is
to break it to see how well you did. If you have done a good job, the steel will
tear an inch away from your intersection, but the intersection itself will
remain intact. If the steel tears
very close to your intersection, you probably overheated and weakened the steel.
If the intersection fails exactly where it was brazed, you may have let
oxygen get to your work (use more flux, keep the flame exhaust flowing over the
hot area), may not have cleaned the pieces sufficiently before brazing, or may
not have let the brass flow sufficiently to attach to the steel.
You may have not used enough brass - built up a big enough bead - but
this condition is more rare than the others.
![]()
![]()
Oxy-Acetylene Welding Main Menu
Tell a Friend About BikeWebSite
Please feel free to link your web pages to www.bikewebsite.com - Thanks!
![]()
Copyright © 1991-2014, bikewebsite.com